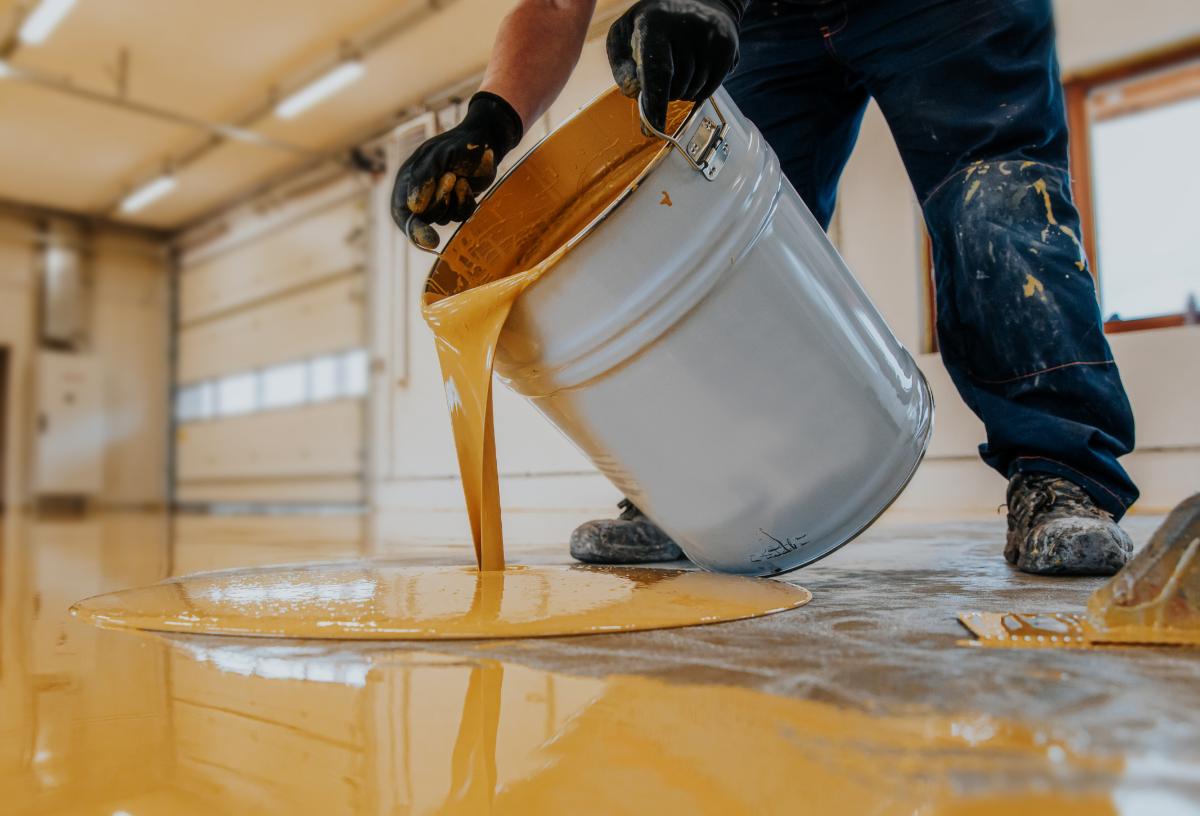
Epoxy flooring : Detailing epoxy flooring involves creating a precise and high-quality finish on an epoxy floor installation. Epoxy flooring is popular for its durability, aesthetic appeal, and ease of maintenance, and proper detailing is key to ensuring the floor performs well and looks great for years. Here are the steps and considerations involved in detailing epoxy flooring: 1. Surface Preparation Cleaning: The floor must be thoroughly cleaned to remove all dust, dirt, grease, and other contaminants. This is essential to ensure proper adhesion of the epoxy coating. Surface Repair: Any cracks, holes, or imperfections in the floor need to be patched and leveled. If there is damage to the concrete or substrate, use a repair compound to fill in the gaps. Sanding or Grinding: Concrete floors typically need to be sanded or ground down to create a rough surface. This rough texture allows the epoxy to adhere better. For existing floors, you may need to remove old coatings by grinding or shot-blasting. 2. Priming Epoxy Primer: Applying an epoxy primer helps create a strong bond between the floor and the epoxy coating. It also seals the surface, preventing air bubbles or moisture from affecting the final finish. Allow to Cure: Once the primer is applied, it needs to cure for the recommended amount of time before applying the epoxy coating. 3. Mixing Epoxy Proper Mixing: When preparing the epoxy coating, ensure that it is mixed thoroughly, following the manufacturer's instructions. Epoxy is a two-part system (resin and hardener), and the ratio must be followed accurately for the correct chemical reaction. Avoiding Air Bubbles: Mix slowly to avoid introducing air bubbles that could get trapped in the coating and impact the finish. 4. Applying Epoxy Coating Layering: Apply the epoxy coating in thin, even layers. You may need multiple layers depending on the desired thickness or type of finish. Start with a base coat and allow it to cure before applying additional layers if needed. Rollers and Brushes: Use rollers or brushes to apply the epoxy evenly across the floor. For smooth finishes, a roller with a long nap can help to spread the epoxy uniformly. Brushes are used for edges and corners. Avoiding Puddles: Ensure that the coating is spread out evenly and does not form puddles. Puddles can create imperfections or leave sticky spots on the floor once it cures. 5. Creating Effects or Decorative Detailing Flake or Quartz Additives: Epoxy floors can be enhanced with decorative elements like colored flakes or quartz aggregates. These elements are either broadcast onto the wet epoxy layer or mixed directly into the resin. This not only improves the aesthetic appeal but can also enhance slip resistance. Metallic Epoxy: For a high-end, unique finish, metallic epoxy can be used. The metallic pigment is swirled into the epoxy, creating a marble-like, 3D appearance that adds depth and style. Stenciling or Custom Logos: In commercial spaces, logos or custom stencils can be applied to create unique and branded designs in the epoxy finish. 6. Leveling and Smoothing Self-Leveling Epoxy: Some epoxy coatings are self-leveling, meaning they spread out smoothly without leaving brush marks or roller streaks. Ensure the room is temperature-controlled to avoid bubbles or uneven curing. Smoothing Out Imperfections: After the first layer is applied, smooth out any imperfections, bubbles, or lines with a trowel or smoothing tool before it hardens. 7. Curing Time and Polishing Curing: Allow each coat of epoxy to cure fully before applying the next layer (if multiple layers are used). Curing times vary based on the type of epoxy, but it's typically around 24-48 hours. Polishing or Buffing: Once the final layer is completely cured, the floor can be polished or buffed to enhance the shine and smoothness of the finish. Polishing also helps to remove any inconsistencies or imperfections. 8. Sealing and Protection Top Coat/Sealer: After the epoxy has cured, a clear top coat or sealer can be applied for additional protection, especially in high-traffic areas. This step also helps to improve the durability and appearance of the floor, providing resistance to scratches and stains. UV Protection: Some floors require UV protection to prevent yellowing or fading, particularly in areas with exposure to sunlight. Specialized UV-resistant coatings can be added. 9. Final Inspection Inspection for Imperfections: Once all layers are cured and sealed, inspect the floor for any imperfections, such as bubbles, streaks, or missed spots. Fix these issues before allowing heavy use of the space. Clean-Up: Clean up any tools, and remove any debris or dust left on the floor. 10. Maintenance of Epoxy Floors Regular Cleaning: Epoxy floors are relatively easy to clean, but regular maintenance is important to keep them looking their best. Sweep or mop the floor frequently to prevent dirt buildup. Periodic Recoating: Depending on the level of traffic, the floor may require periodic recoating or touch-ups to maintain its appearance and durability. By carefully following these steps, detailing an epoxy floor ensures a high-quality, durable, and aesthetically pleasing surface that can withstand the wear and tear of both residential and commercial spaces. www.bechennai.com, Mobile no :888 333 33 22.

This is your website preview.
Currently it only shows your basic business info. Start adding relevant business details such as description, images and products or services to gain your customers attention by using Boost 360 android app / iOS App / web portal.
Epoxy flooring : Detailing epoxy flooring invol...
2025-02-10T09:24:09
Epoxy flooring : Detailing epoxy flooring involves creating a precise and high-quality finish on an epoxy floor installation. Epoxy flooring is popular for its durability, aesthetic appeal, and ease of maintenance, and proper detailing is key to ensuring the floor performs well and looks great for years. Here are the steps and considerations involved in detailing epoxy flooring: 1. Surface Preparation Cleaning: The floor must be thoroughly cleaned to remove all dust, dirt, grease, and other contaminants. This is essential to ensure proper adhesion of the epoxy coating. Surface Repair: Any cracks, holes, or imperfections in the floor need to be patched and leveled. If there is damage to the concrete or substrate, use a repair compound to fill in the gaps. Sanding or Grinding: Concrete floors typically need to be sanded or ground down to create a rough surface. This rough texture allows the epoxy to adhere better. For existing floors, you may need to remove old coatings by grinding or shot-blasting. 2. Priming Epoxy Primer: Applying an epoxy primer helps create a strong bond between the floor and the epoxy coating. It also seals the surface, preventing air bubbles or moisture from affecting the final finish. Allow to Cure: Once the primer is applied, it needs to cure for the recommended amount of time before applying the epoxy coating. 3. Mixing Epoxy Proper Mixing: When preparing the epoxy coating, ensure that it is mixed thoroughly, following the manufacturer's instructions. Epoxy is a two-part system (resin and hardener), and the ratio must be followed accurately for the correct chemical reaction. Avoiding Air Bubbles: Mix slowly to avoid introducing air bubbles that could get trapped in the coating and impact the finish. 4. Applying Epoxy Coating Layering: Apply the epoxy coating in thin, even layers. You may need multiple layers depending on the desired thickness or type of finish. Start with a base coat and allow it to cure before applying additional layers if needed. Rollers and Brushes: Use rollers or brushes to apply the epoxy evenly across the floor. For smooth finishes, a roller with a long nap can help to spread the epoxy uniformly. Brushes are used for edges and corners. Avoiding Puddles: Ensure that the coating is spread out evenly and does not form puddles. Puddles can create imperfections or leave sticky spots on the floor once it cures. 5. Creating Effects or Decorative Detailing Flake or Quartz Additives: Epoxy floors can be enhanced with decorative elements like colored flakes or quartz aggregates. These elements are either broadcast onto the wet epoxy layer or mixed directly into the resin. This not only improves the aesthetic appeal but can also enhance slip resistance. Metallic Epoxy: For a high-end, unique finish, metallic epoxy can be used. The metallic pigment is swirled into the epoxy, creating a marble-like, 3D appearance that adds depth and style. Stenciling or Custom Logos: In commercial spaces, logos or custom stencils can be applied to create unique and branded designs in the epoxy finish. 6. Leveling and Smoothing Self-Leveling Epoxy: Some epoxy coatings are self-leveling, meaning they spread out smoothly without leaving brush marks or roller streaks. Ensure the room is temperature-controlled to avoid bubbles or uneven curing. Smoothing Out Imperfections: After the first layer is applied, smooth out any imperfections, bubbles, or lines with a trowel or smoothing tool before it hardens. 7. Curing Time and Polishing Curing: Allow each coat of epoxy to cure fully before applying the next layer (if multiple layers are used). Curing times vary based on the type of epoxy, but it's typically around 24-48 hours. Polishing or Buffing: Once the final layer is completely cured, the floor can be polished or buffed to enhance the shine and smoothness of the finish. Polishing also helps to remove any inconsistencies or imperfections. 8. Sealing and Protection Top Coat/Sealer: After the epoxy has cured, a clear top coat or sealer can be applied for additional protection, especially in high-traffic areas. This step also helps to improve the durability and appearance of the floor, providing resistance to scratches and stains. UV Protection: Some floors require UV protection to prevent yellowing or fading, particularly in areas with exposure to sunlight. Specialized UV-resistant coatings can be added. 9. Final Inspection Inspection for Imperfections: Once all layers are cured and sealed, inspect the floor for any imperfections, such as bubbles, streaks, or missed spots. Fix these issues before allowing heavy use of the space. Clean-Up: Clean up any tools, and remove any debris or dust left on the floor. 10. Maintenance of Epoxy Floors Regular Cleaning: Epoxy floors are relatively easy to clean, but regular maintenance is important to keep them looking their best. Sweep or mop the floor frequently to prevent dirt buildup. Periodic Recoating: Depending on the level of traffic, the floor may require periodic recoating or touch-ups to maintain its appearance and durability. By carefully following these steps, detailing an epoxy floor ensures a high-quality, durable, and aesthetically pleasing surface that can withstand the wear and tear of both residential and commercial spaces. www.bechennai.com, Mobile no :888 333 33 22.
2025-02-10T09:24:09
Share it on


Keywords
- create imperfections
- floor 10 maintenance
- cure fully
- applied smooth
- completely cured
- imperfections 8 sealing
- imperfections bubbles
- hightraffic areas
- mixed directly
- needed rollers
- floor frequently
- floor performs
- epoxy coatings
- epoxy evenly
- regular maintenance
- create unique
- final layer
- steps detailing
- epoxy coating
- highquality durable
- allowing heavy
- sealed inspect
- prevent yellowing
- finish polishing
- 2448 hours polishing
- avoid bubbles
- branded designs
- custom stencils
- style stenciling
- adds depth
- metallic pigment
- quartz aggregates
- colored flakes
- decorative elements
- long nap
- smooth finishes
- base coat
- finish start
- desired thickness
- recommended amount
- final finish
- strong bond
- existing floors
- rough texture
- gaps sanding
- repair compound
- cracks holes
- considerations involved
- highquality finish
- epoxy creating
- dust left
- bubbles streaks
- multiple layers
- polishing curing
- selfleveling meaning
- custom logos
- rough surface
- smoothing tool
- proper detailing
- aesthetic appeal
- additional protection
- applying additional layers
- durability aesthetic appeal
- epoxy floor ensures
- epoxy uniformly brushes
- wet epoxy layer
- epoxy coating ensure
- smoothing selfleveling epoxy
- roller streaks ensure
- multiple layers depending
- floor providing resistance
- marblelike 3d appearance
- decorative detailing flake
- space cleanup clean
- clear top coat
- twopart system resin
- manufacturers instructions epoxy
- uneven curing smoothing
- aesthetically pleasing surface
- commercial spaces logos
- ensure proper adhesion
- dust dirt grease
- stains uv protection
- protection top coatsealer
- require periodic recoating
- missed spots fix
- leaving brush marks
- leave sticky spots
- form puddles puddles
Submit Your Enquiry